
Sunday, 5 April 2009
Electrics
As I've detailed in a previous post I have made the phone so that I can use an electroluminescent panel in place of the screen. As this model is an exhibition/display model I think it needs the element of lighting to it to make it more effective and fulfill the purpose it would hypothetically be used in industry for. One of the main issues with using the light panel has been constructing the phone so that there is room for the battery pack that is needed to power the screen. I didn't want to have any wires coming from the phone if I could help it, so I managed to mill out a slot underneath the dialling buttons of the phone, in which the batteries can sit. There are eight AA batteries to hold, which will add a certain amount of weight to the model, however as the basic structure is already quite light, this shouldn't be a problem.

Detailing
Having sprayed the phone, I'm now at a point where I can put some of the componants into place. I've tried to make them accurately enough so that they can simply slot in, without the need to use glue and potentially compromise the finish of the phone.


Masking
For the back part of the phone half of the outside edge needs to be sprayed in a different colour. For this I needed to mask this line off. I'm using something called fine line tape, which is able to curve with the shape of the phone without gathering, so I can get a neat smooth line.


To get the best results with the tape you need to pull it off once the paint is touch dry. I was really impressed with the result, which produced a neat crisp line.
Spraying...Ahhhhh!
It has come time to spray the phone. By this point I have produced several sample colours and mixed up one that I am happy with and that matches well to the colour of the phone fascia I am using as reference. Before spraying the final cellulose coat I have primed both sides of the phone to a standard where I could not see any marks or dents.

However, when I gave the front face of the phone its first couple of coats of paint, I was not particualrly happy with the result...I had some dry spray around certain sections and there was a quite noticeable blemish on two parts of the phone. One at the top of the phone, and another in the area of where I had slotted in the piece of chemiwood with the walkman logo. This was frustrating as neither of these marks could be seen in the final coat of primer I had applied. The reason being is because the paint I mixed has a satin sheen to it, therefore in certain lights the marks are visible because the surface is not 100% even. To correct this problem I used wet sand paper at a grade of 8oo to take back any raised areas.

These problem areas continued to show up with another couple of coats of cellulose. Continually spraying and then using a very fine sandpaper grade to try and blend the discrepancies, eventually improved the problem, so the marks are a lot less visible than before.
I was recommended to use cellulose stopper paint to try and correct the problem. This acts as a sort of filler to even out the surface, however on further research of this product and due to time constraints I decided I didn't want to risk causing any further problems.
http://www.lrcars.fsnet.co.uk/page15.html Information page on stopper.
Another issue!
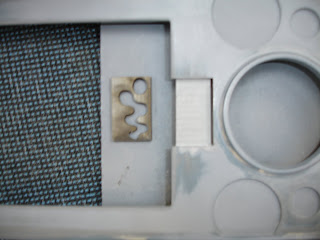
I have come to realise that when the CNC machine cut out the walkman logo on the front of the phone, for some reason it cut the shape bigger than it was meant to. This was a problem also for the shadow gap that runs across the back face of the phone. For the shadow gap I simply got some styrene pushed it into the position I wanted it and filled the rest of the gap up to the styrene. Once the car bodyfiller had set I merely pulled the styrene away and the gap had been made smaller with a really neat crisp line. However this method didn't work for the front logo as it's a much more complex shape. Therefore I had to mill out the section along the front face where the logo was, in order to provide a space. In this space I glued in a piece of chemiwood that had the correct logo size lasercut into it. I used chemiwood rather than acrylic to prevent an obvious difference in material that may have showed up when spraying. Chemiwood, like MDF tends to burn in the lasercutter so I used a setting that was as gentle as possible but that still allowed me to cut all the way through the material, which was 4mm deep. This problem has probably lost me a days worth of time.


Outside Strip
The phone has a strip running along the outside edge of the front face. As this strip is a different colour however to the main face it needed to be constructed separately so that it can be painted separately and then glued on afterwards. I decided to use 1mm styrene to create this section. I cut the template out by hand and using double-sided tape to keep it in place I heat bent it around the edge of the phone. I can now take it off the phone again and it will retain its shape ready to be sprayed.


Getting there!
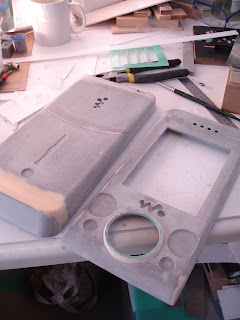
The phone by this point has really started to take shape. I have finished CNCing the main structure and I am at the point where I have re-corrected the mistake I had made when using the CNC machine with the wrong zero point. Now I am using car body filler to fill in any dents or sections with curves. As the chemiwood had a strong grain like surface to it I have been smoothing that out with sandpaper and coating the phone with primer as I go along. I'm finding that chemi-wood creates a nice surface finish through sanding and works well with car body filler.

Separate Componants
With this model I have been working on the main body of the phone, whilst also trying to create smaller componants such as buttons and alike as I go along, so I can make everything fit together well. One of the central pieces of the phone is the disk button at the front. On the w580i part of this is aluminium and the other part is plastic that has been sprayed with a metal effect. I have chosen to use aluminium to create all of it, as I think it will look more effective. Both these pieces will need to have an emblem cut into them and I plan to do this through the CNC machine.


DISK BUTTON:
I lathed the larger section of aluminium and then, to sit within it I lathed a disk of black acylic which chamfers inward. The smaller piece on the right of the picture, which will eventually sit in the centre of the disk on the left, was also lathed from aluminium. I then using a hack-saw and metal file cut from the same piece the cross sections.
CHARGER PORT:

This I created from lasercutting different sections from acrylic and then gluing together. I used a thin sheet of brass to act as the connector sections and sprayed the rest of it black.
CAMERA SECTION and DIALLING BUTTONS:

I made the camera section from a sheet of acrylic, creating the raised part using more acrylic and filling between the two levels with car body filler. The buttons that will be used as the dialling buttons were drawn in the programme Rhino, and then laser cut. I then sanded the edges down by hand to give them a slight radius as is the case with the w580i phone.
LOGO:

This part was made from lasercutting the letters and the piece of acrylic needed to sit the letters onto. I then sprayed the back section black and the letters in a chrome effect paint.
Subscribe to:
Posts (Atom)